Most of web traffic now comes from mobile phones, not desktops. As such, contemporary web applications need to easily adjust to numerous resolutions, element ratios, and gadgets. The React-Bootstrap library draws from 2 popular structures ( React and Bootstrap) to assist in the development of reliable, effective, and responsive web applications.
This post talks about the foundation and advantages of React-Bootstrap and checks out comprehensive examples in a sample application, providing an enhanced advancement experience for your next web job.
Structures: The What and Why of React-Bootstrap
Bootstrap, constructed on CSS and JavaScript, is a CSS structure that allows responsive website design utilizing a grid design of rows and columns. Let’s take a look at React-Bootstrap in the context of CSS structures and vanilla Bootstrap to determine the jobs that it may best serve.
Bootstrap and CSS Frameworks
When constructing a site, CSS explains the visual components on a page, and altering a website’s CSS can supply a much-needed transformation. In contemporary web styling, nevertheless, CSS alone will not be enough– responsive website design is necessary, and structures make CSS designers‘ lives much easier.
Responsive website design permits applications to customize designs and components based upon a range of gadgets and window or screen sizes. CSS structures supply fringe benefits such as sped up advancement, minimized code duplication, and enhanced code base maintainability.
There are lots of structures to streamline composing CSS; Tailwind CSS and Structure are 2 popular choices. Nevertheless, Bootstrap is a basic option for responsive CSS due to advantages like:
- A strong neighborhood and substantial documents.
- A reputable environment with a range of styling elements, consisting of pre-made blocks, styles, and design templates.
- Customizability and cross-browser compatibility.
Let’s take a look at the compromises when choosing in between React-Bootstrap and vanilla Bootstrap.
Bootstrap vs. React-Bootstrap
With a lot of benefits out of package, why would not we wish to utilize plain Bootstrap for React applications? The response depends on the method React is constructed.
React does not suggest that designers customize the DOM straight; rather, it mainly utilizes the virtual DOM, or VDOM, to track all the modifications to the DOM. Respond can miss out on modifications outside the VDOM, resulting in bugs, mistakes, and unforeseen habits.
Previous variations of Bootstrap rely greatly on jQuery, which straight alters the DOM and can for that reason produce these unfavorable results. Get in React-Bootstrap, the library that offers access to every Bootstrap element and depends upon pure JavaScript rather of jQuery, customizing just the VDOM.
In addition to avoiding unfavorable habits associated to the DOM, React-Bootstrap likewise provides tidy and understandable syntax. Let’s produce the exact same example card utilizing Bootstrap and React-Bootstrap to compare:

Our Bootstrap card’s code consists of lots of div tags, making it tough to determine each element:
<< div className=" card">
<> < img src=" https://bs-uploads.toptal.io/blackfish-uploads/public-files/React-icon-8e26f22094a11f6a689d8302dc30782c.svg" className=" card-img-top" alt=" ..."/>>.
<< div className=" card-body">
<> < h5 className=" card-title">> Example Card<.
<< p className=" card-text">> This is an example Respond card<.
<< a href=" #" className=" btn btn-primary">> Example Button<.
<.
<.
On the other hand, our React-Bootstrap card's code plainly identifies each element:
<< Card>>.
<< Card.Img variation=" leading" src=" https://upload.wikimedia.org/wikipedia/commons/a/a7/React-icon.svg"/>>.
<< Card.Body>>.
<< Card.Title>> Example Card<.
<< Card.Text>> This is an example Respond card<.
<< Button variation=" main">> Example Button<.
<.
<.
Do these 2 advantages make React-Bootstrap exceptional to Bootstrap in every method? No. Since variation 5, Bootstrap no longer utilizes jQuery and can be utilized with React. And, till just recently, React-Bootstrap had no assistance for Bootstrap 5, which indicated that designers might not update their React-Bootstrap jobs with brand-new Bootstrap releases. React-Bootstrap v2 resolves this issue.
If you are thinking about moving your job from React to some other structure, such as Vue, Bootstrap provides the very best versatility. You can recycle the majority of the plain Bootstrap code, however React-Bootstrap users will need to transform their code. Bootstrap and React-Bootstrap each have their benefits and drawbacks, and which one you choose to utilize depends upon your particular requirements. In our case, we're focusing on readability above versatility for migration.
Execution: Elegant Parts With React-Bootstrap
To take a look at a practical React-Bootstrap execution, let's produce a basic site UI with a navbar, a footer, and a responsive grid.
Setup and Fundamentals
Initially, let's produce a brand-new React app in the terminal:
npx create-react-app react-bootstrap-example-- design template typescript.
Next, set up both React-Bootstrap and Bootstrap (setting up Bootstrap is essential due to the fact that it consists of all the designs for React-Bootstrap elements):
npm set up bootstrap react-bootstrap.
If you do not prepare to bypass Bootstrap's default designs, it will be essential at this moment to import Bootstrap's stylesheet, bootstrap/dist/css/ bootstrap.min.css, in the src/App. tsx file. (We will bypass default Bootstrap designs to utilize customized styling, so we do not require to perform this action.)
In basic, there are 2 methods to import React-Bootstrap elements. The very first method utilizes this syntax:
 import Button from 'react-bootstrap/Button';
import Container from 'react-bootstrap/Container';
Nevertheless, I choose utilizing destructured imports due to the fact that they condense and streamline the code for several elements:
import {Button, Container} from 'react-bootstrap';
Lastly, we render a React-Bootstrap element with this syntax:
<< Button>> This is a button<.
Custom-made Designs
Default Bootstrap designs (such as colors) can be bypassed with customized styling for a more special website design. Let's bypass Bootstrap's 13 text colors with our own. Initially, we set up Sass:
npm set up sass.
Next, relabel the App.css file to App.scss, to show it is a Sass file, and import './ App.scss'; in the App.tsx file. In our App.scss file, we bypass the main and secondary colors prior to importing the Sass Bootstrap stylesheet:
$ main: # 204ecf;
$ secondary: # 262d3d;

@import '~ bootstrap/scss/bootstrap';
Constantly ensure to bypass designs prior to importing Bootstrap stylesheets. Otherwise, the customized designs will not be used.
Containers
Containers are one of the most standard, fundamental React-Bootstrap element; they are a foundation in the execution of more complex elements such as grids. Containers additionally center and horizontally pad the material within them.
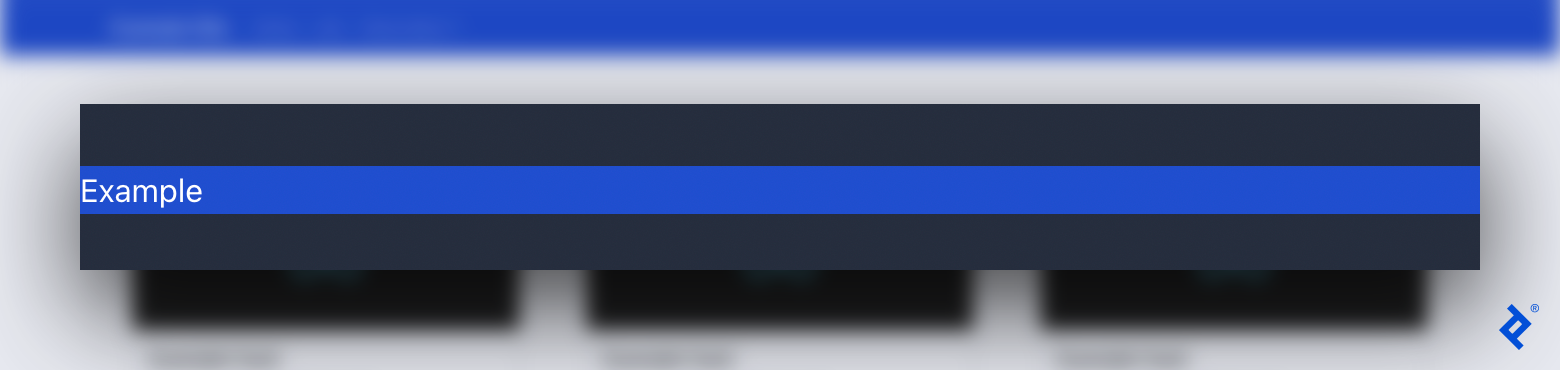
Prior to including the navbar, footer, and grid system to our site, let's see how containers impact their contents. We produce an easy text ( p) within a generic area ( div) briefly in src/App. tsx We make the area blue and our total background gray to make the design much easier to see:
<< div className=" bg-primary">
<> < p>> Example<.
<.
Without a React-Bootstrap container, our material is unpadded and unresponsive:
Let's attempt the exact same code with a React-Bootstrap Container rather of a generic div (we'll need to import Container prior to utilizing it):
<< Container className=" bg-primary">
<> < p>> Example<.
<.
Now, our material appears with cushioning:
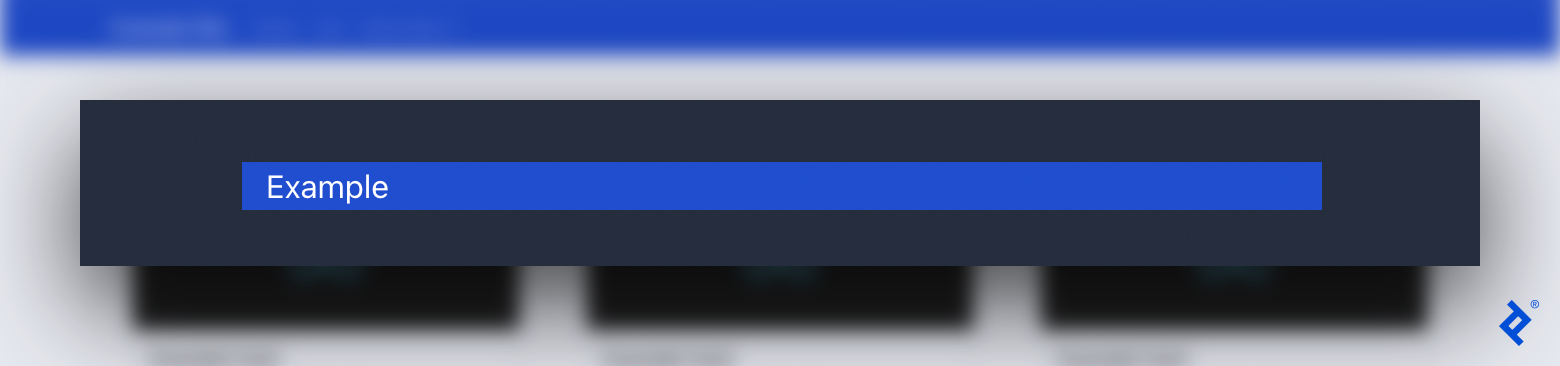
Modification the width of the web browser window to see the responsive style in action.
Navbars
The very first element to contribute to our example website is the navbar Developing a different React element for the navbar (instead of composing it along with other code) makes it much easier to discover elements and make modifications.
Produce a src/components folder and include the file ResponsiveNavbar.tsx We import the Navbar and other essential elements. Then, we include a standard navbar, covered in the responsive Container element, which shows our website logo design or title ( Navbar.Brand):
 import {Navbar, NavDropdown, Nav, Container} from 'react-bootstrap';

const ResponsiveNavbar = () => > {
return (.
<< Navbar bg=" main" collapseOnSelect broaden=" sm">
<> < Container>>.
<< Navbar.Brand href="/">> Example Website<.
<.
<.
);
};

export default ResponsiveNavbar;
We are passing 3 arguments to the navbar:
-
bgaffects the color of the navbar. -
collapseOnSelecttriggers the navbar to immediately collapse when the user picks a product. -
broadenfigures out when the navbar will collapse (smimplies that it will collapse at a width of 768 px).
For an advanced navbar, we'll include a toggled hamburger menu ( Navbar.Toggle) showing "House," "Link," and "Drop-down" areas. Navbar.Toggle is unnoticeable in desktop mode. Nevertheless, when seeing the site on smaller sized screens, it condenses horizontal areas, covered by Navbar.Collapse, into a mobile-friendly hamburger menu.
<< Navbar bg=" main" collapseOnSelect broaden=" sm">
<> < Container>>.
<< Navbar.Brand href="/">> Example Website<.
<< Navbar.Toggle aria-controls=" navbar-toggle"/>>.
<< Navbar.Collapse id=" navbar-toggle">
<> < Nav className=" me-auto">
<> < Nav.Link href="/">> House< < Nav.Link href="/ link">> Link< < NavDropdown title=" Drop-down" id=" nav-dropdown">
<> < NavDropdown.Item href="/ action1">> Action 1<.
<< NavDropdown.Item href="/ action2">> Action 2<.
<< NavDropdown.Item href="/ action3">> Action 3<.
<.
<.
<.
<.
<.
Navbar.Toggle and Navbar.Collapse are effective tools that assist designers produce responsive navigation bars with couple of lines of code.
Lastly, we import ResponsiveNavbar from './ components/ResponsiveNavbar'; and include it in our primary App:
<< div className=" d-flex flex-column">>.
<< ResponsiveNavbar/>>.
<.
You might check the app at any time by running npm start to see it upgrade with each element included.
Our navbar is total, so let's deal with the website's footer. Similar to ResponsiveNavbar, we require to state Footer and export it in a brand-new Footer.tsx file. We produce a standard footer utilizing text, links, and a Container:
<< div className=" bg-secondary mt-auto">>.
<< Container className=" p-3">
<> < p className=" text-center text-white">> Thank you for visiting this site<.
<< p className=" text-center mt-5 text-white">> Follow us on social networks:<.
<< a href="/">> Instagram< < a href="/">> Facebook< < a href="/">> Twitter< .
<.
The classes p-3 and mt-5 represent cushioning and margin-top, and their worths can vary in between no and 5 (e.g., p-5 and mt-1 are likewise choices) or be set to automobile It is likewise crucial to include mt-auto, as it will press the footer to the bottom of the page once we include Footer to our App in the next action.
Next, to show the social links side by side with proper spacing, we include a Row element and nest every link within a Col (column) element (we need to likewise include Row and Col to our React-Bootstrap imports):
<< div className=" bg-secondary mt-auto">>.
<< Container className=" p-3">
<> < p className=" text-center text-white">> Thank you for visiting this site<.
<< p className=" text-center mt-5 text-white">> Follow us on social networks:<.
<< Row>>.
<< Col className=" text-center">
<> < a href="/">> Instagram< .
<< Col className=" text-center">
<> < a href="/">> Facebook< .
<< Col className=" text-center">
<> < a href="/">> Twitter< .
<.
<.
<.
Our last action is to position the footer at the bottom of our page in our App:
<< div className=" d-flex flex-column min-vh-100">>.
<< ResponsiveNavbar/>>.
<< Footer/>>.
<.
Here, we have actually likewise set the minimum height of the website to 100vh; this is the complete height of the screen (100% of the viewport height) and makes sure the footer appears at the real bottom of the screen rather of appearing straight listed below other material.
Grid Systems
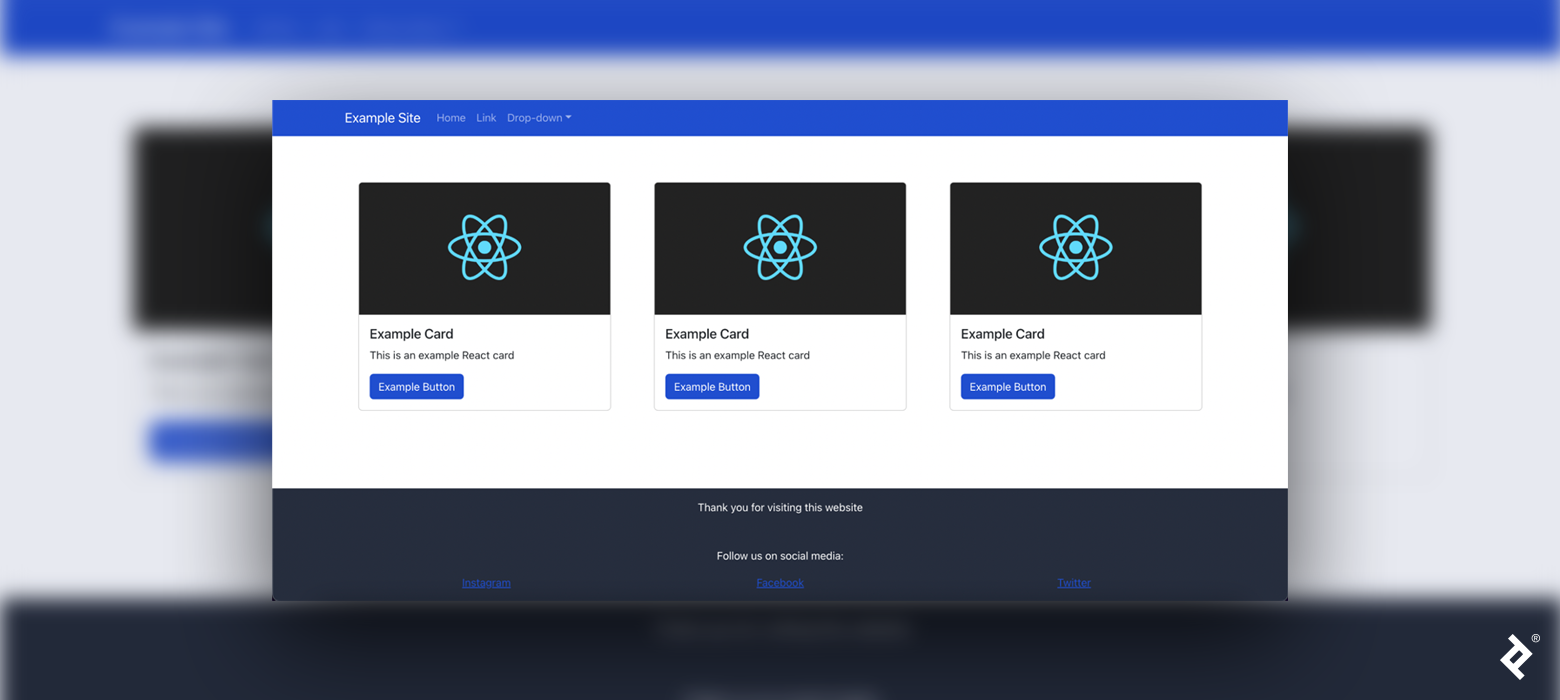
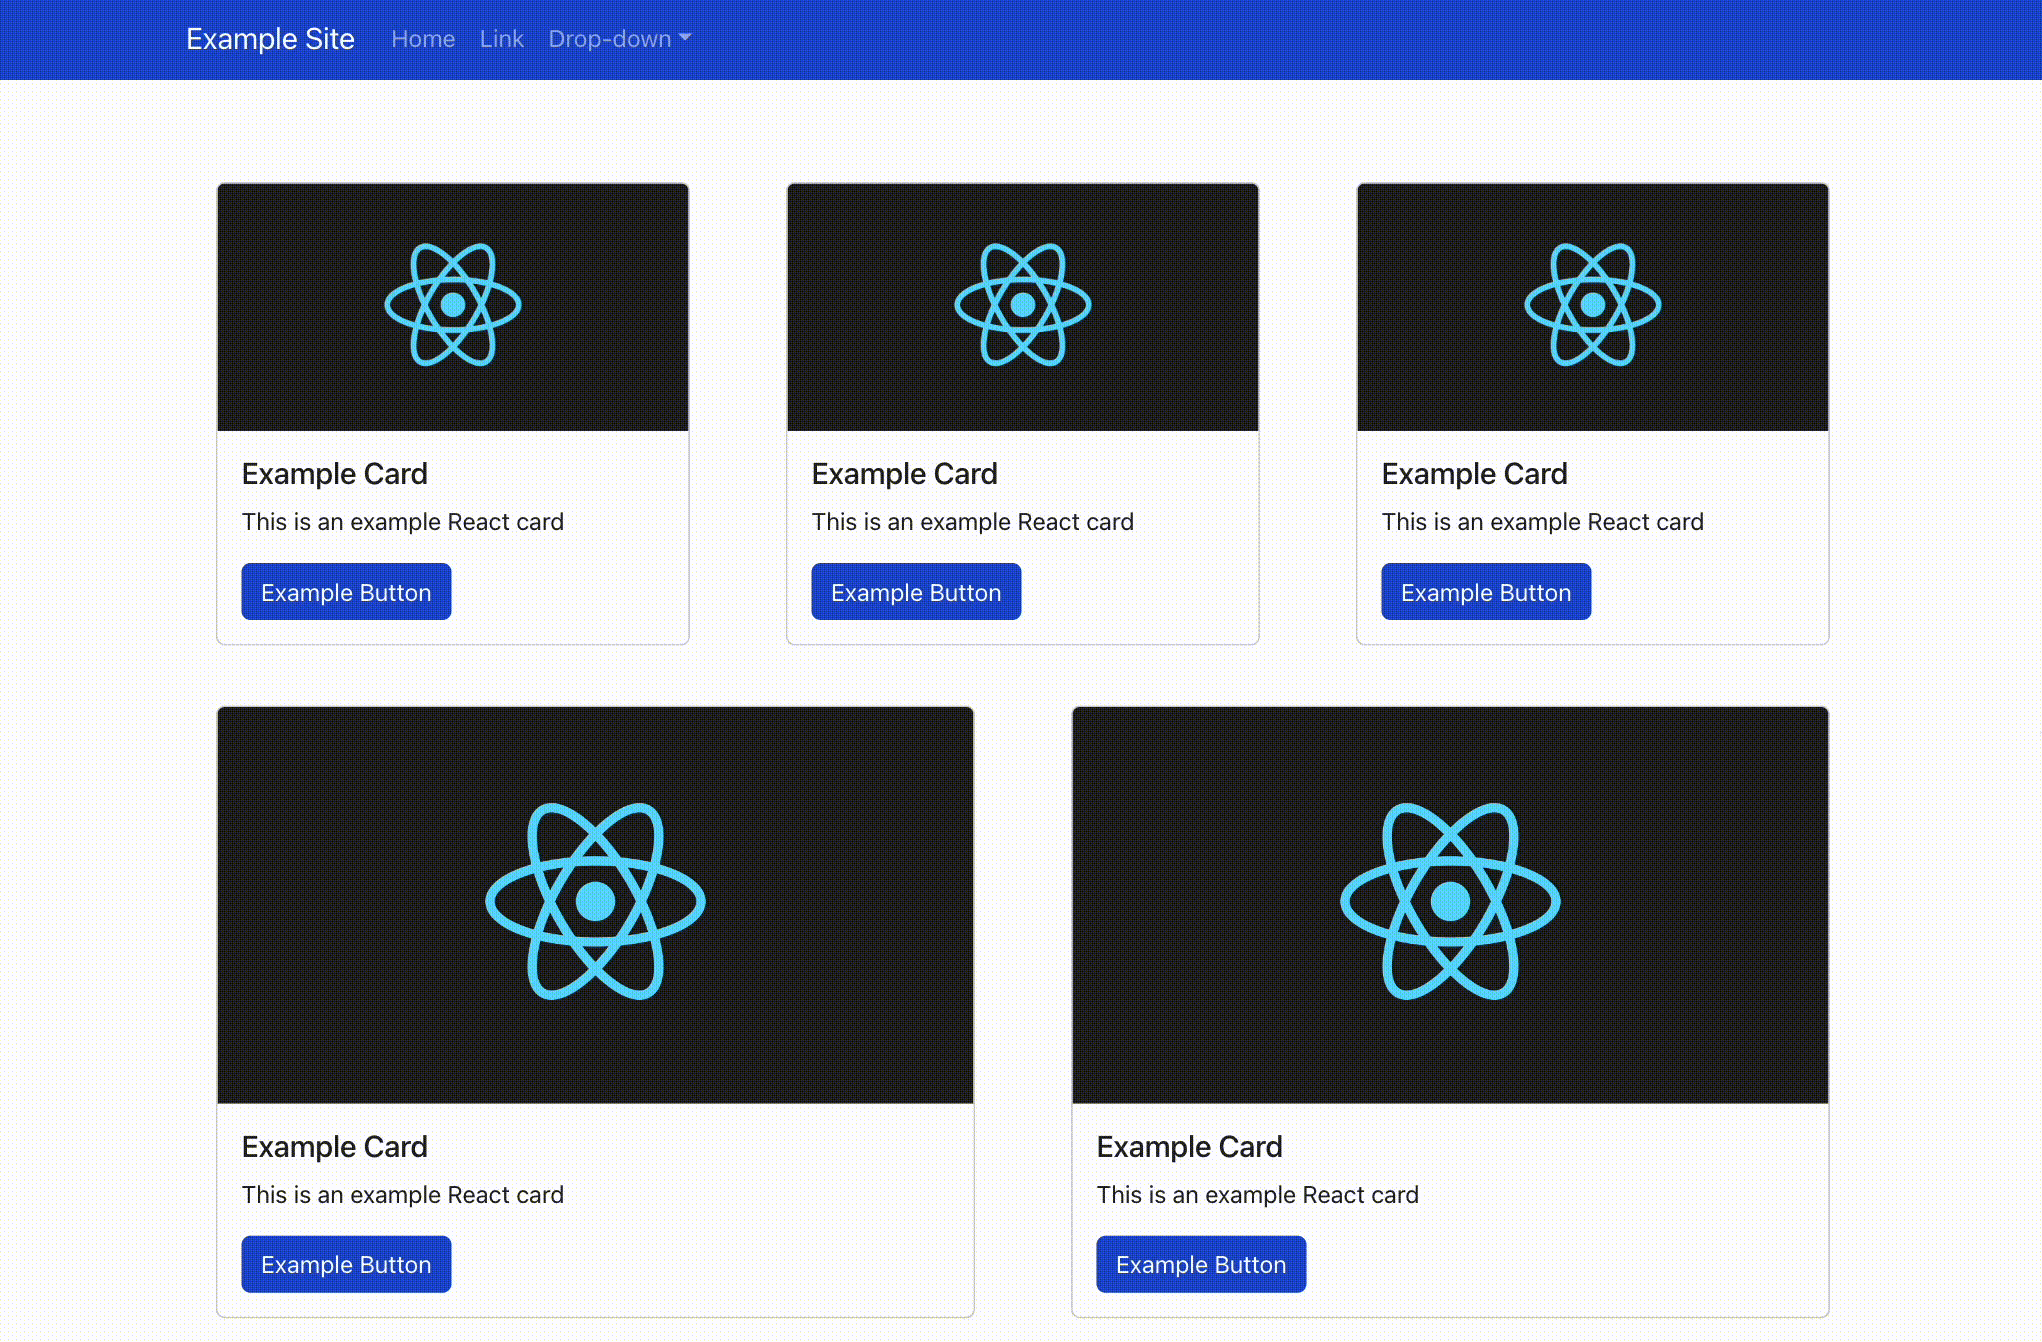
With our navbar and footer in location, we complete the site by including a grid system to the page. Our grid will consist of Card elements, which we specify and export in a brand-new Item.tsx file:
<< Card design= {{minWidth: '18rem', margin: '20px'}} >>.
<< Card.Img variation=" leading" src=" ..."/>>.
<< Card.Body>>.
<< Card.Title>> Example Card<.
<< Card.Text>> This is an example Respond card<.
<< Button variation=" main">> Example Button<.
<.
<.
Now we can return to App.tsx and include a vibrant grid of rows and columns in between the navbar and the footer. We need to cover our grid system in a Container:
<< Container className=" mt-5">
<> < Row>>.
{Array.from( Variety( numberOfItems). secrets()). map( number => > (.
<< Col secret= {number} >>.
<< Product/>>.
<.
))}
<.
<.
We can select a consistent for numberOfItems to manage the number of times the Product element is rendered. The columns are immediately sized and responsive for all screen sizes. Attempt resizing your web browser window to test the result
Responsive Web Advancement Facilitated
React-Bootstrap's tidy syntax and simple elements make responsive style easy to carry out on any job. The capability to deal with Bootstrap and React-Bootstrap is a need to for front-end designers. With these tools in your ability, you're all set for much easier web application style and prototyping.
The editorial group of the Toptal Engineering Blog site extends its appreciation to Stated Kholov for examining the code samples and other technical material provided in this post.
Additional Continuing Reading the Toptal Blog Site:
.